Projects and Components
Projects and Components are how you organize everything you ship. This page covers the hierarchy they sit in, how to create them well, and the two ways a component gets its container image.
DevsPortal is built on the Control Plane Operator engine. The occ CLI and
openchoreo.dev/v1alpha1 resources below are unchanged engine internals.
The portal UI is the recommended path; the equivalent occ CLI commands follow for scripting.
The hierarchy
DevsPortal organizes applications in four nested levels:
Namespace (your team / org boundary — managed by platform engineers)
└── Project (a bounded context; becomes an isolated runtime cell)
    └── Component (one deployable unit)
        └── Workload (image + endpoints + dependencies)
- Namespace — your team or organization boundary. On Fedshi that's typically
the
fedshinamespace (or a per-team namespace your platform engineers carved out). You don't create namespaces yourself; that's a team-onboarding step. - Project — a logical group of related components that share a deployment pipeline and a runtime cell. Map a Project to a business capability or a domain, not to a single service.
- Component — one deployable unit: a service, a web app, a worker, or a scheduled task.
- Workload — the runtime contract for that component, covered in Workloads and endpoints.
Projects
A Project is deliberately minimal. It carries a name, optional human-readable metadata, and a reference to a DeploymentPipeline that controls how its components promote across environments.
How to think about project boundaries
Group components that are released together and owned by one team. On Fedshi, good projects look like:
checkout— cart, payment, and order-history services that ship togethercatalog— the product catalog API plus its search indexer workerstorefront— the customer-facing web app and its backend-for-frontend
Two components that need to talk to each other but belong to different teams should live in different projects and communicate over declared endpoints — see Dependencies. Two components owned by one team that always ship together belong in the same project.
Create a project
In the portal: open Create… in the sidebar — the self-service catalog of templates your platform engineers maintain — and pick the Project card under Application Resources.
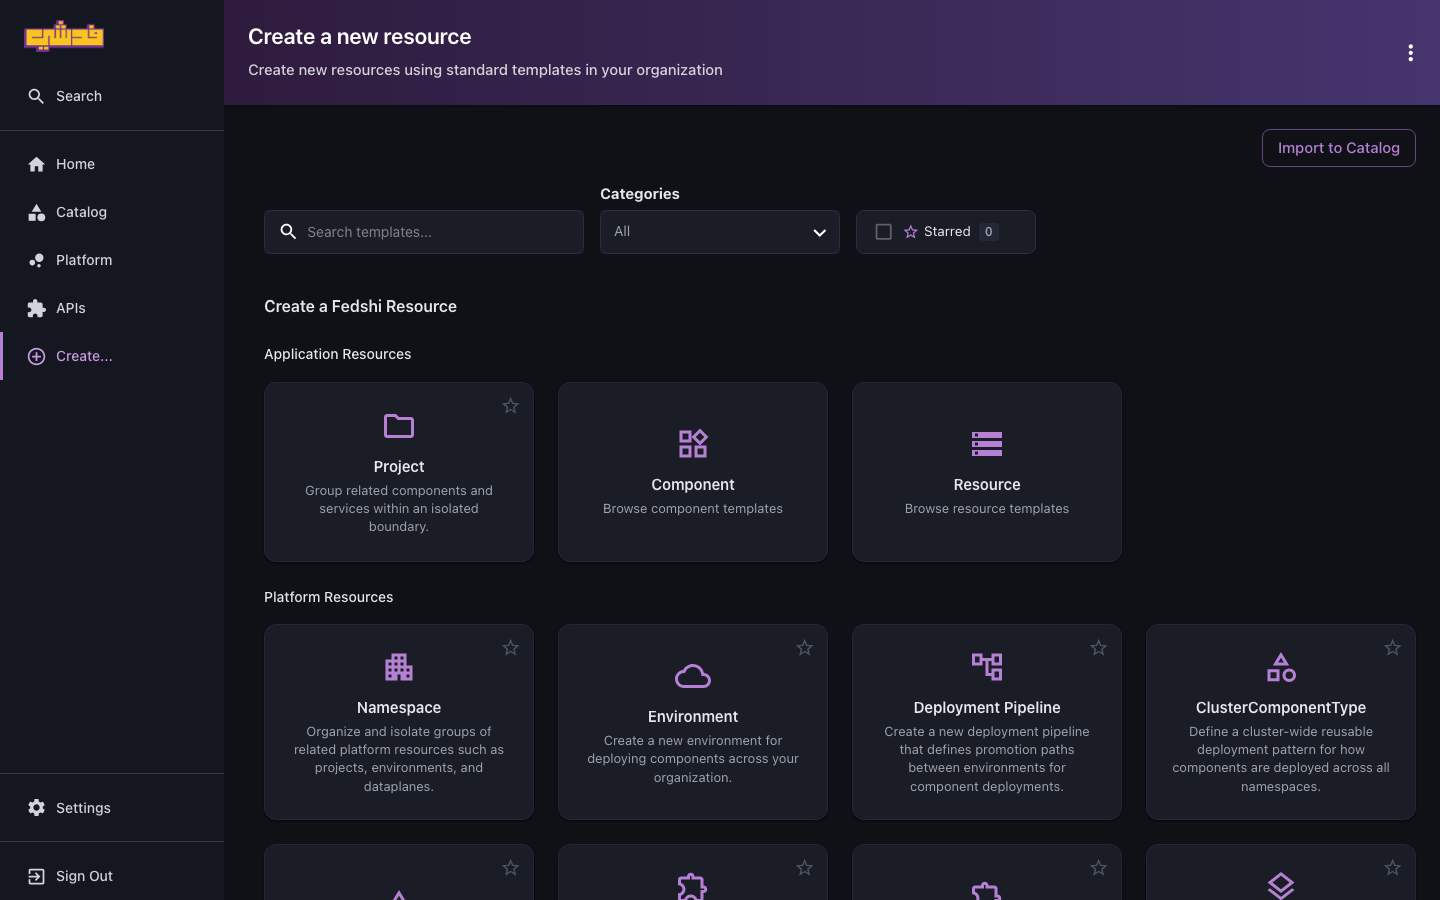
Fill in the name (a valid Kubernetes name), an optional display name and description, pick a
deployment pipeline (defaults to default), and click Create. The new project appears
in the Catalog immediately. (You can also reach the same form from the Create
Project button on the Catalog page.)
Or with the occ CLI, apply a manifest:
# project.yaml
apiVersion: openchoreo.dev/v1alpha1
kind: Project
metadata:
  name: checkout
  namespace: fedshi
  annotations:
    openchoreo.dev/display-name: "Checkout"
    openchoreo.dev/description: "Cart, payment, and order-history services"
spec:
  deploymentPipelineRef:
    kind: DeploymentPipeline
    name: default
occ apply -f project.yaml
A default project and default deployment pipeline already exist on every instance. You
only need new projects when you want a separate pipeline or a clean ownership boundary —
which, for any real team, you do.
Manage projects
In the portal: open the Catalog from the sidebar and set the Kind filter to Project to list every project, with Namespace, Type, and Starred filters to narrow the view. Click a project to open it, or use the Create Project button to add another.
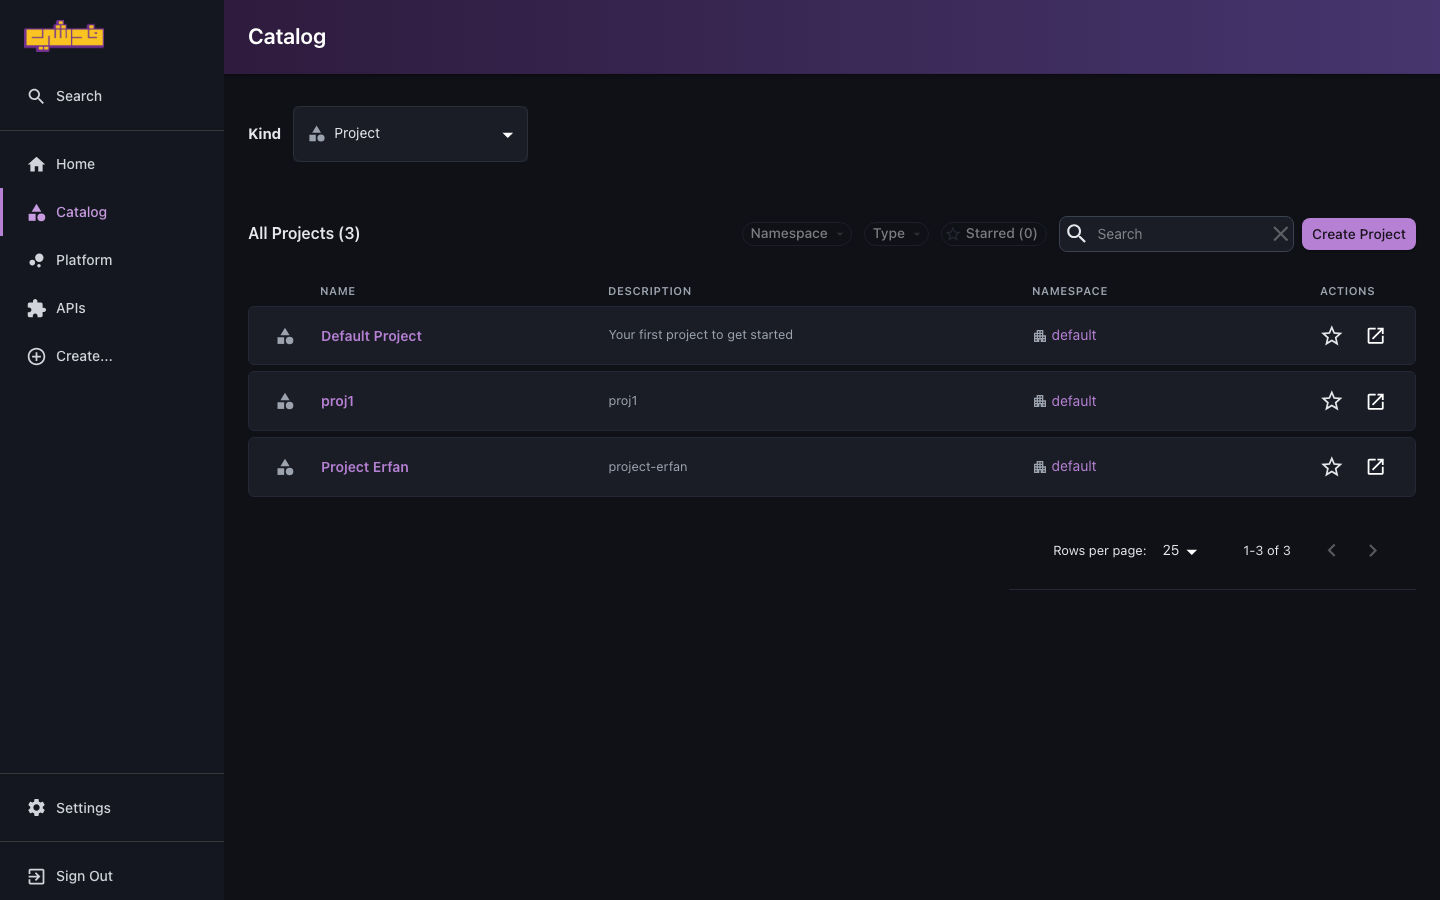
Or with the occ CLI:
occ project list -n fedshi
occ project get checkout -n fedshi
occ project delete checkout -n fedshi      # also deletes every component inside it
Deleting a Project deletes all Components within it. There's no undo.
To assign an owner to a project (so it shows up correctly in catalog ownership views), add
a backstage.io/owner annotation — see Ownership model.
Components
A Component is a single deployable unit inside a Project. Every Component references a ComponentType, and optionally attaches Traits and a build Workflow.
Choosing a ComponentType
ComponentTypes are templates your platform engineers maintain. They decide the workload shape and what parameters you can tune. In the portal the Create Component wizard presents the available types as a picklist, so you rarely need to look them up by hand. To list the cluster-wide ones (available in every namespace) from the CLI:
occ clustercomponenttype list
The built-ins cover most needs:
| ComponentType reference | Workload | Use for |
|---|---|---|
deployment/service | Deployment | Backend services and APIs |
deployment/web-application | Deployment | Frontend or full-stack web apps |
deployment/worker | Deployment | Background workers with no exposed endpoint |
cronjob/scheduled-task | CronJob | Periodic batch jobs |
The reference format is {workloadType}/{componentTypeName} and goes in the Component's
spec.componentType.name. Your platform engineers may have added Fedshi-specific
types (for example, a hardened deployment/service variant with required limits) — run
the list command to see what's actually on offer.
Create a component — in the portal
Open Create… and pick the Component card. The Create Component wizard has three steps:
- Metadata — namespace, project, component name, optional display name and description.
- Build & Deploy — choose where the image comes from: Build from Source (the platform builds it), Container Image (you supply a prebuilt image), or External CI (your existing Jenkins/GitHub Actions builds it).
- Type-specific details — generated from the ComponentType: parameters (replicas, port, limits), endpoints, environment variables, file mounts, and any Traits.
Click Create and the component appears in the catalog.
Create a component — or with the occ CLI
The fastest CLI path is to scaffold a starting YAML from a ComponentType, which pre-fills defaults and documents every field:
occ component scaffold cart-api \
  --clustercomponenttype deployment/service \
  --namespace fedshi --project checkout \
  -o cart-api.yaml
You can fold in traits and a build workflow at scaffold time:
occ component scaffold cart-api \
  --clustercomponenttype deployment/service \
  --clustertraits observability-alert-rule \
  --clusterworkflow dockerfile-builder \
  -o cart-api.yaml
Edit the generated file, then occ apply -f cart-api.yaml.
Two deployment patterns
How a component gets its image is the main decision when you create it.
Pattern A — prebuilt image
You already have an image (your own CI built it, or it's a third-party image). Provide it directly in the Workload; the platform deploys it with no build step:
apiVersion: openchoreo.dev/v1alpha1
kind: Component
metadata:
  name: cart-api
  namespace: fedshi
spec:
  owner:
    projectName: checkout
  componentType:
    kind: ClusterComponentType
    name: deployment/service
  autoDeploy: true
---
apiVersion: openchoreo.dev/v1alpha1
kind: Workload
metadata:
  name: cart-api
  namespace: fedshi
spec:
  owner:
    projectName: checkout
    componentName: cart-api
  container:
    image: registry.idp.fedshi.com/checkout/cart-api:1.4.0
  endpoints:
    http:
      type: HTTP
      port: 8080
      visibility: [project]
Use this when you run your own CI, deploy a third-party image, or want full control of the build.
Always set kind: ClusterComponentType explicitly. If you omit kind, it defaults to the
namespace-scoped ComponentType, and the built-in types are cluster-scoped. The same goes
for traits — specify kind: ClusterTrait for the built-in ones.
Pattern B — build from source
Point the component at a git repo and a build Workflow, and the platform builds the image and generates the Workload for you:
apiVersion: openchoreo.dev/v1alpha1
kind: Component
metadata:
  name: cart-api
  namespace: fedshi
spec:
  owner:
    projectName: checkout
  componentType:
    kind: ClusterComponentType
    name: deployment/service
  autoDeploy: true
  autoBuild: true
  workflow:
    kind: ClusterWorkflow
    name: dockerfile-builder
    parameters:
      repository:
        url: "https://github.com/fedshi/checkout"
        revision:
          branch: "main"
        appPath: "/cart-api"
      docker:
        context: "/cart-api"
        filePath: "/cart-api/Dockerfile"
With autoBuild: true, every push to the configured branch triggers a new build. The full
build story — workflows, private repos, the workload.yaml descriptor — is in
Builds and CI.
Adding Traits
Traits are reusable cross-cutting capabilities — alerting rules, an OAuth2 proxy,
storage — that your platform engineers publish. Attach them in the traits array; each
instance needs a unique instanceName:
spec:
  traits:
    - kind: ClusterTrait
      name: observability-alert-rule
      instanceName: high-error-rate
      parameters:
        enabled: true
        condition: "error_count > 100"
List what's available with occ clustertrait list. Which traits and types you're allowed
to use is itself a governance decision your
platform engineers make.
Manage components
In the portal: open a project from the Catalog to see its components, or set the Catalog Kind filter to Component to list components directly. Click a component to open it and act on it from its tabs.
Or with the occ CLI:
occ component list -n fedshi -p checkout
occ component get cart-api -n fedshi
occ component delete cart-api -n fedshi
What's next
- Workloads and endpoints — define the image, endpoints, and visibility.
- Builds and CI — build from source.
- Deploy and promote — ship across environments.